my1

Thursday, March 28, 2013

Flash Color Quiz: What's Your Mood?

Flash Color Quiz: What's Your Mood? 
 
Getting Started
Flash Color Quiz: What's Your Mood?

Adding the Intro
 
Flash Color Quiz: What's Your Mood?

Setting Up Clickable Choices
 
Flash Color Quiz: What's Your Mood?


To move my animation beyond the intro movie clip and start the quiz, I used an on (release) and gotoAndPlay attached to an invisible hotspot movie clip that overlaps the area of my intro animation that I want to be clickable:
on (release) { 
_root.gotoAndPlay(2); 
}
Note that I used _root in front of my gotoAndPlay? Since we're talking about the main timeline, just using the gotoAndPlay on a movie clip would confuse Flash just a touch, as it wouldn't be sure if you were referring to the movie clip timeline or the main stage's timeline.
Please note: code is not meant to be copied directly. Page template issues and formatting may automatically convert some symbol characters to formatted/HTML equivalents, and they won't work properly when pasted into Flash. Please use this code as guidelines to write your own.


Creating Quiz Questions
Flash Color Quiz: What's Your Mood? 

The next step is to set up the first quiz question (or only quiz question, if you're basing it on a single color choice). I started off by adding a quick instruction reminder, and then creating a single white movie clip with a black outline and then duplicating it eight times to create nine choices. (Tip: I used the Align Panel to space everything evenly.) Why not create a separate symbol for each color choice? You'll see.

Copying Instances
Flash Color Quiz: What's Your Mood? 
Rather than create nine separate symbols, it's easiest to just set a tint on copied instances of the same symbol, using the Color dropdown in each symbol's Properties panel and setting the tint to 100%. I've set a different tint on each symbol to reflect all of my quiz's color choices.

Coding Results
Flash Color Quiz: What's Your Mood?

Now it's time to add the code to each color option to assign a value to a variable that will tell the results page what results to display, as well as move the quiz to either the next question or the end results. Right-click on the first symbol and select Actions:
on (release) { 
_root.tint = "yellow"; 
_root.gotoAndPlay(9); 
}
This script creates a root-level variable called "tint", and assigns the string "yellow" as its value. (Notice that I put "yellow" in quotes so it would pass as a text string and nothing else.)
You can copy the script to the Actions for each of your options, and just change the string to reflect the correct option - such as "blue" and "orange".

Finalizing the Quiz
Flash Color Quiz: What's Your Mood?

Once you've finished your first question and added any additional questions on subsequent frames, your last frame should be your Results page. Put any default text on the results page that you want; then create a new text field, and use the Properties panel to change the text field type to "Dynamic Text"
Creating A Controller Movie Clip
Flash Color Quiz: What's Your Mood? . Make sure to assign an instance name to the text field, as we'll be calling it by name when telling Flash to make it display the value of the variable (s) assigned when the users made their choices in the quiz.

It's not a good idea to try to assign ActionScripts to the dynamic text field itself; instead I prefer to use a controller movie clip set off to the side of the stage, whose sole purpose is to contain ActionScripts that act on other objects on the stage.

Creating the Results
Flash Color Quiz: What's Your Mood?

After creating the controller movie clip, create and name another dynamic text field on the stage. This text field will be the one that contains the expanded text of the quiz results, but not any variable values - although its contents will be determined by the value of the variable(s)

Displaying the Results


Flash Color Quiz: What's Your Mood?


The last thing that we need to do is assign ActionScripts to the controller movie clip (within an onClipEvent) to both display the variable text as a result in one dynamic text box, then test against the value of the variable to determine which text will be displayed in the expanded results:
onClipEvent (enterFrame) { 
_root.colorbox.text = _root.tint; 
if (_root.tint=="yellow"){ 
_root.colordes.text = "Yellow description text."; 
} 
}
This script first takes the string assigned to the variable _root.tint and assigns it to the text property of the dynamic text field named "colorbox", so that it displays the value chosen (in this case, yellow).
Next the script uses an if statement to check to see if the value of the variable from the quiz choice matches a set value. If it does, it tells the dynamic text field named "colordes" to display the text string inside quotes. Your complete script would have more than one option; it would repeat the if-statement test by using multiple statements to see if _root.tint matches the strings "blue", "green", etc. and assigning a different string to _root.colordes depending on the match to the tested value.
That's it. Finish fleshing out your if statements for your various choices, and you should have a working quiz.


Working With Tabbed And Floating Documents In Photoshop


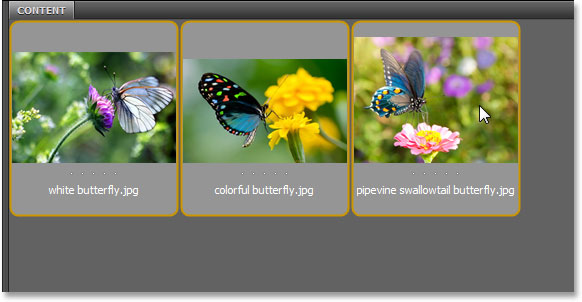
By default, Photoshop CS6 opens our images as tabbed documents. To show you what I mean, here I’m using Adobe Bridge to open a folder containing three images. I want to open all three of them at once in Photoshop, so I’ll click on the image thumbnail on the left to select it. Then, I’ll hold down my Shift key and click on the image thumbnail on the right. This selects all three images at once (including the one in the middle): Selecting three images to open in Adobe Bridge. Image © 2013 Steve Patterson, Photoshop Essentials.com

Selecting three images in Adobe Bridge.
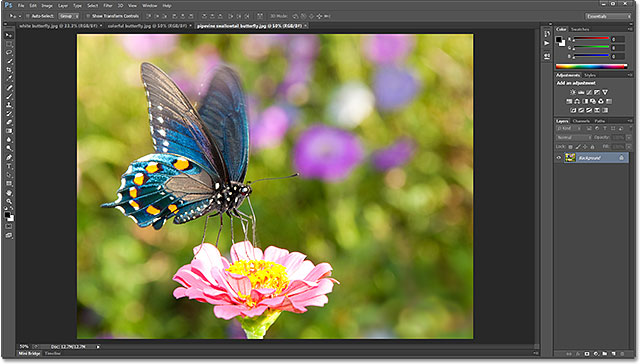
With all of the images selected, I’ll double-click on one of the thumbnails to instantly open all three images in Photoshop. At first glance, something may not seem right. I’ve opened three photos, but only one of them is visible on the screen (pipevine swallowtail butterfly photo from Shutterstock):
Three photos opened as tabbed documents in Photoshop CS6. Image licensed from Shutterstock by Photoshop Essentials.com
Only one of the three photos appears to be open.
Where are the other two photos I opened? Well, they’re actually open as well. We just can’t see them at the moment, and that’s because Photoshop opened the images as a series of tabbed documents. If we look along the top of the photo that’s visible on my screen, we see a row of tabs. Each tab represents one of the open photos, and we can see the name of the photo (along with some other information) in its tab. The tab that’s highlighted is the one that’s currently active, meaning we’re seeing its image on the screen. The other tabs are hiding behind it and not currently visible:
Each document has its own tab at the top. Image © 2013 Photoshop Essentials.com
The row of tabs along the top. Each image gets its own tab. The highlighted tab is currently active.
To switch between the open images, all we need to do is click on their tabs. At the moment, my third image (the tab on the right) is open. I’ll click on the tab in the middle to select it:
Selecting the middle tabbed document. Image © 2013 Photoshop Essentials.com
Clicking on the middle tab.
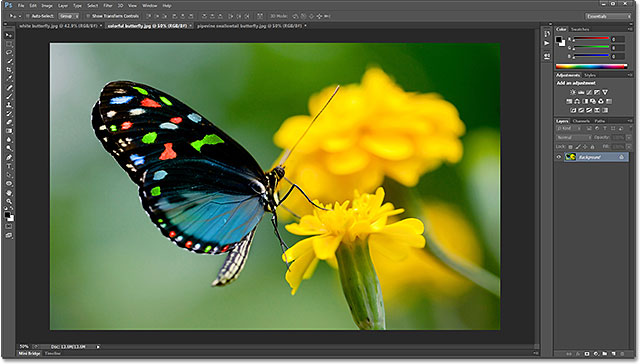
And now we see a different open image on the screen. By default, only one tab can be active and visible at a time, so the image that was visible a moment ago is now hiding in the background (colorful butterfly photo from Shutterstock):
Colorful butterfly photo. Image licensed from Shutterstock by Photoshop Essentials.com
The second of three open images is now visible after clicking on its tab.
I’ll click on the tab on the left to select it and make it active:
Selecting the first tabbed document. Image © 2013 Photoshop Essentials.com
Clicking on the first tab in the row.
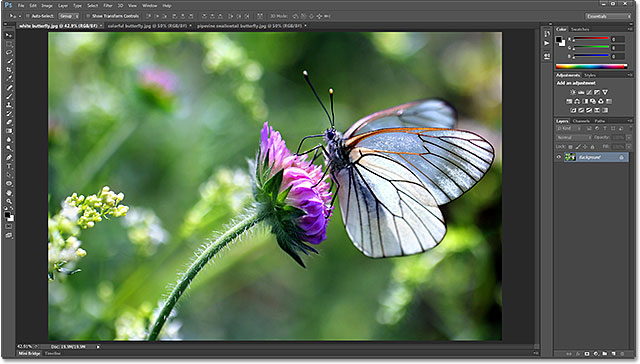
And now the third of my three open images is visible, with the other two photos hiding behind it (white butterfly photo from Shutterstock):
Black-veined White butterfly, Aporia crataegi. Image licensed from Shutterstock by Photoshop Essentials.com
The third of the three photos is now visible after selecting its tab.

Switching Tabs From The Keyboard

We can also switch between the tabs using a handy keyboard shortcut. On a Windows PC, press Ctrl+Tab to move from one tab to another. On a Mac, press Command+~.

Changing The Order Of The Tabs

We can change the order of the tabs simply by clicking on a tab and, with your mouse button still held down, dragging the tab to the left or right of the other tabs. Release your mouse button to drop the tab into place:
Dragging a tab to the right to change the order of the images. Image © 2013 Photoshop Essentials.com
Dragging a tab to the right to change the order of the images.

Floating Document Windows

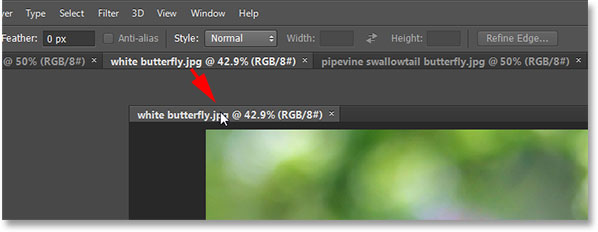
The other way to view our open images in Photoshop CS6 is by displaying them as floating document windows. If you have multiple images open as tabs, as I do here, and you want to float just one of the images, click on the image’s tab and, with your mouse button held down, drag the tab down and away from the other tabs:
Dragging a tab to the right to change the order of the images. Image © 2013 Photoshop Essentials.com
Clicking and dragging one of the tabs away from the others.
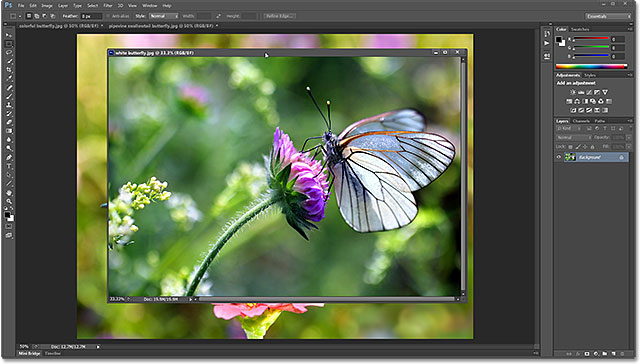
Release your mouse button and the image will appear in front of the tabbed images in its own separate, floating document window. You can move floating document windows around on the screen by clicking in the tab area along the top of the window and, with your mouse button held down, dragging it around with your mouse:
A floating document window in Photoshop CS6. Image © 2013 Photoshop Essentials.com
A single image appearing in a floating document window.
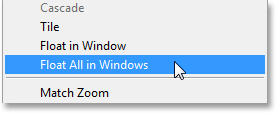
If you want to switch all of your tabbed documents to floating windows, go up to the Window menu in the Menu Bar along the top of the screen, choose Arrange, and then choose Float All in Windows:
Selecting the Float All in Windows command in Photoshop CS6. Image © 2013 Photoshop Essentials.com
Going to Window > Arrange > Float All in Windows.
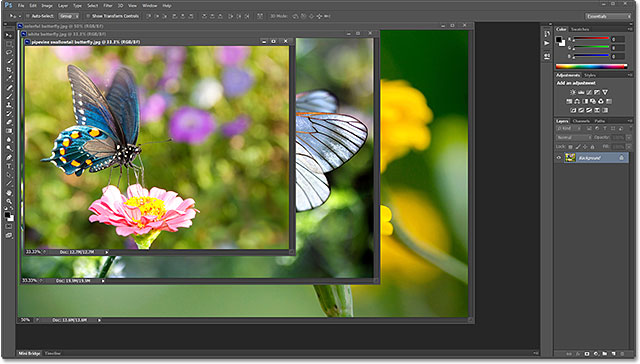
And now all three of my images appear in floating windows, with the currently active window displayed in front of the others. Again, we can move the windows around on the screen to reposition them by clicking and dragging the tab area along the top of each window. To make a different window active and bring it to the front, just click on it:
Images displayed as floating document windows in Photoshop CS6. Image © 2013 Photoshop Essentials.com
All three images now appear in floating windows.

Viewing A List Of Open Documents

One of the main advantages to viewing our images as floating windows is that we can see more than one image at a time, but that can also cause some problems. If you have too many floating windows open at once, your screen can get cluttered, and some windows can completely block others from view. Fortunately, there’s an easy way to select any image that’s currently open on your screen.
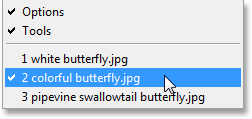
If you go up to the Window menu at the top of the screen and look down at the very bottom of the menu that appears, you’ll see a handy list of every image currently open, each one listed by name. The currently active image has a checkmark beside it. Simply click on any image in the list to select it, which will make it active and bring it to the foreground:
A list of open documents appears in the Window menu in Photoshop. Image © 2013 Photoshop Essentials.com
A list of all open documents appears at the bottom of the Window menu.

Switching Back To Tabbed Documents

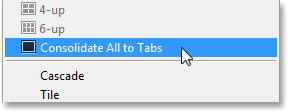
To switch from floating windows back to tabbed documents, go up to the Window menu at the top of the screen, choose Arrange, and then choose Consolidate All to Tabs:
Choosing the Consolidate All to Tabs command in Photoshop. Image © 2013 Photoshop Essentials.com
Going to Window > Arrange > Consolidate All to Tabs.
And now my images once again appear as tabbed documents, with only one image visible at a time:
The floating documents have been consolidated to tabs. Image © 2013 Photoshop Essentials.com
All floating windows have reverted back to tabbed documents.

Setting Photoshop’s Preferences

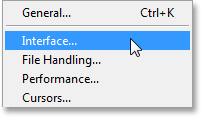
Once you decide which viewing style you like best (tabbed documents or floating windows), you can tell Photoshop to open all future images in that style using an option found in the Preferences. On a Windows PC, go up to the Edit menu at the top of the screen, choose Preferences way down at the bottom of the list, and then choose Interface. On a Mac, go up to the Photoshop menu, choose Preferences, then choose Interface:
Choosing Photoshop's Interface preferences from the Edit menu. Image © 2013 Photoshop Essentials.com
Opening the Interface preferences.
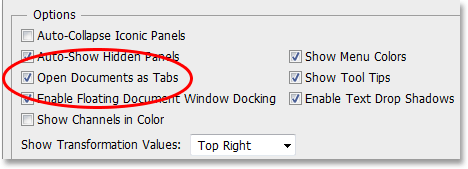
This opens Photoshop’s Preferences dialog box set to the Interface options. Near the center of the dialog box is an option that says Open Documents as Tabs. By default, this open is checked, which means that all of your images will open as tabbed documents. If you’d prefer to have them open as floating windows, uncheck this option:
The Open Documents as Tabs option in Photoshop's Preferences. Image © 2013 Photoshop Essentials.com
The Open Documents as Tabs option.
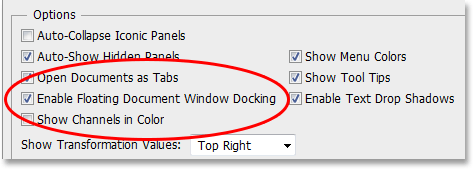
There’s a second option directly below it that’s also important. You may have trouble saying it five times fast, but the Enable Floating Document Window Docking option controls whether or not we can drag one floating window into another and nest them together, creating tabbed documents inside a floating window:
The Enable Floating Document Window Docking option in Photoshop's Preferences. Image © 2013 Photoshop Essentials.com
The Enable Floating Document Window Docking option.
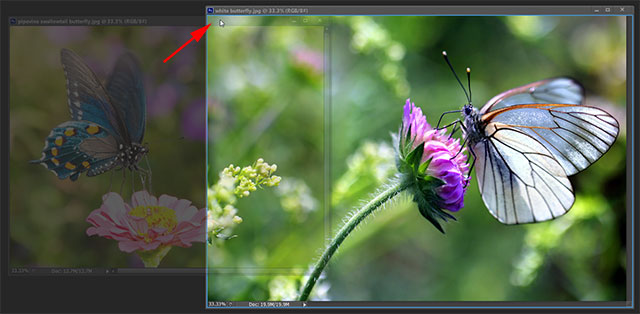
To show you what I mean, here I have two of my images open side by side as floating windows. I’ll click on the tab area along the top of the window on the left and begin dragging it into the window on the right. As I drag up towards the top of the window on the right, we see a blue highlight box appearing around its edges. This highlight box tells me that if I release my mouse button at this point, Photoshop will dock both of the images together inside the same floating window:
Docking two floating windows together in Photoshop CS6. Image © 2013 Photoshop Essentials.com
Dragging an image from one floating window into another.
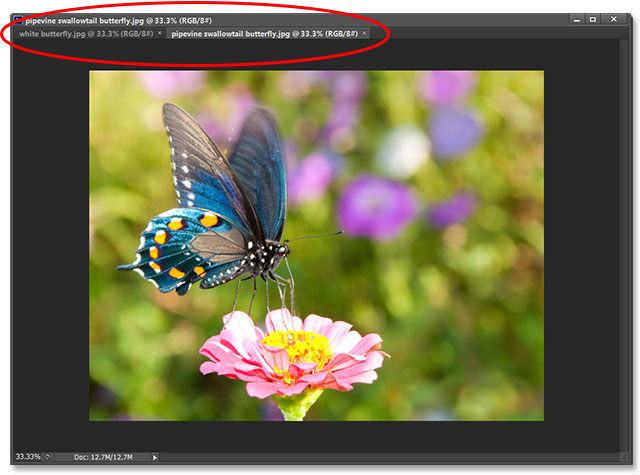
I’ll go ahead and release my mouse button, and now both of my images are grouped together as tabbed documents inside a single floating window, which can be a handy feature for keeping related images organized on the screen. Just as with normal tabbed documents, I can easily switch between them by clicking on their tabs. To separate the images again and place them back into their own floating windows, all you need to do is click and drag one of the tabs away from and outside of the window, then release your mouse button:
Two images docked together as tabs inside a floating window. Image © 2013 Photoshop Essentials.com
The two images are now docked together as tabs inside a floating window.
The Enable Floating Document Window Docking option is enabled (checked) by default, but if you decide you don’t like this feature, you can easily turn it off by unchecking the option in Photoshop’s Preferences.

Closing Tabs And Floating Windows

Finally, to close a single image that’s open as a tabbed document, click on the small “x” icon on the edge of its tab:
Closing a tabbed document in Photoshop CS6. Image © 2013 Photoshop Essentials.com
Closing a single tabbed document.
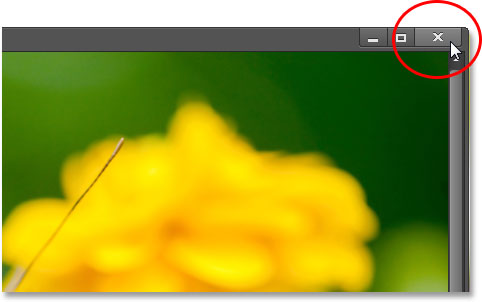
To close an image open in a floating window, click the “x” icon in the top right corner of the window (on a Mac, click the red “x” icon in the top left corner):
Closing a floating document window in Photoshop CS6. Image © 2013 Photoshop Essentials.com
Closing a single floating window.
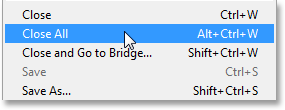
To close all open images regardless of which view style you’re using, go up to the File menu at the top of the screen and choose Close All:
Selecting the Close All command in Photoshop CS6. Image © 2013 Photoshop Essentials.com
Going to File > Close All.
And there we have it! That’s a quick look at the differences between viewing images as tabbed documents or floating windows in Photoshop CS6!